Most of us sometimes don’t realize that tyres, apart from serving as the car’s footwear are also its most important sensory components. Tyres are the only parts of a car which are in direct contact with the surface beneath. On modern cars, they constantly sense and transmit key information from the road to the ECU through electronic means, which in turn controls engine power, drive to axles, braking and other parameters to ensure that the vehicle is stable and secure at all times. Even on cars which don’t have Traction Control or an Electronic Stability Programme, the tyres need to get sufficient traction at all times for the vehicle to be stable. It is for this reason that no amount of active or passive safety tech would be able to provide you protection and comfort unless your car’s tyres are functioning the way they should.

This makes it extremely important for one to be conscious about the correct specification of the tyres he needs to install on his machine. For e.g. a tyre which is not rated for high speeds, if installed on a premium sports car, might just give way much before the car reaches its limit, putting the occupants’ safety in jeopardy. To ensure that the consumer has all the information he needs before he makes a choice, most tyres these days come marked with codes representing critical parameters. In this guide, we will take you through all the markings you’ll find on modern car tyres. We’ll explain to you what they mean, and why they are important.
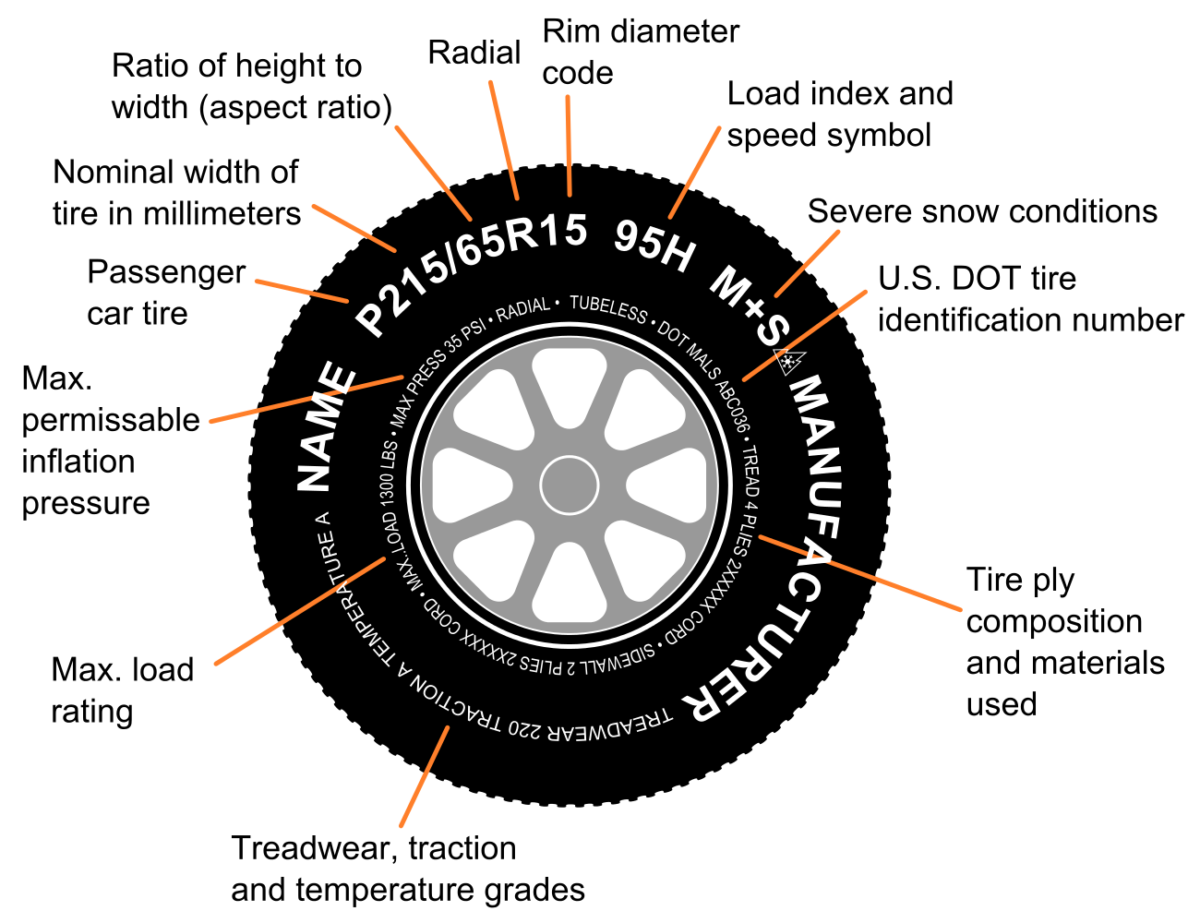
Vehicle Type
To start with, a tyre manufacturer may optionally indicate what type of vehicle the tyre is made for. The optional letters, which are generally at the beginning of the prominent markings on the sidewall of a tyre may indicate the vehicle class.
P – represents a passenger car
LT – represents a light truck
ST – represents a special trailer
T – represents a temporary or restricted usage pattern, something on the lines of a space saver spare wheel which is meant to be driven for small distances and at low speeds in case of an emergency

It’s also notable that the European Tyre and Rim Technical Organisation (ETRTO) and the Tire and Rim Association (TRA) are two organizations controlling the standards of tyres in Europe and USA respectively. So the tyres which have a Vehicle Type marking (e.g. P) indicate that they conform to TRA standards, and an absence of any such marking generally means that they are meant to comply with ETRTO standards. For India, the Automotive Tyre Manufacturers’ Association (ATMA) along with its technical wing, Indian Tyre Technical Advisory Committee (ITTAC) and the Bureau of Indian Standards tries its bit to ensure the consistency in tyre manufacturing and labelling.
Size, load and speed rating
While the ‘vehicle type’ marking may or may not be present on a tyre’s sidewall, the markings for size, load and speed are almost always going to be there. If they’re not provided, you should seriously reconsider buying the tyre brand, as it’s almost certainly sub-standard.
As an example, the size, load and speed marking on the sidewall would read something like this 205/55 R16 91W
Tyre width
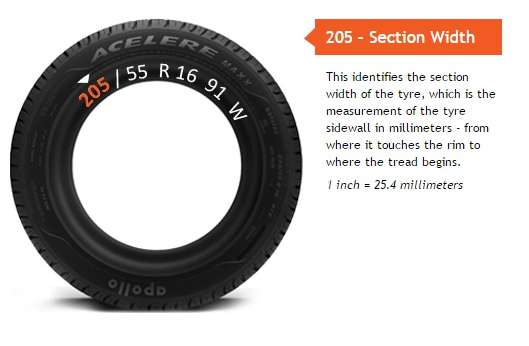
The first three digits of the marking represent the width, also known as the ‘nominal section width’ of the tyre in millimetres. It’s notable that this number represents the width of the tyre from sidewall to sidewall, and not the width of the tyre’s contact patch, which is slightly smaller. In our example this number is represented by 205, and is followed by a ‘/ ’ character for separating the next number.
Aspect Ratio

The next two digit number following the slash represents what is known as the ‘aspect ratio’. In simple terms, it is the height of the sidewall or the ‘profile’ of the tyre. So tyres with a high aspect ratio are termed high profile tyres, while the ones with a lower aspect ratio are called low profile tyres. The number representing aspect ratio is a percentage of the nominal section width of the tyre. In our example, it’s 55 – which means that the tyre’s aspect ratio is 55% of its nominal sectional width.
Tyre construction
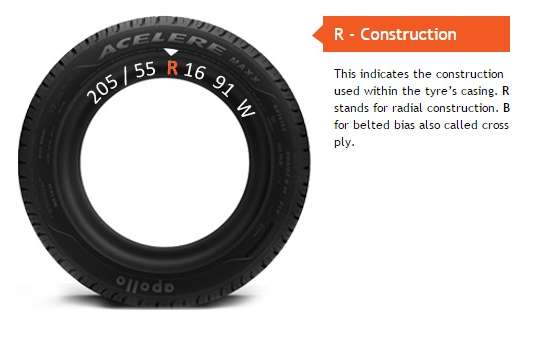
The aspect ratio is followed by a code indicating the construction type of the tyre. The codes are represented by letters, and this what they mean
B – represents a belted bias or cross ply construction, where tyre’s sidewalls and tread are made of the same material. Although these tyres offer a sturdy sidewall, they heat up quickly, and also affect comfort negatively owing to a rigid sidewall.
R – represents radial tyres which have the belt running 90 degrees to the direction of rotation. They run cooler even at high speed, and offer advantages in cornering. These are the tyres most modern cars come equipped with.
Our example marking reads R, which means the tyre is a radial construction. If the tyre doesn’t have any such marking, then it is supposed to be a cross-ply tire
Wheel diameter
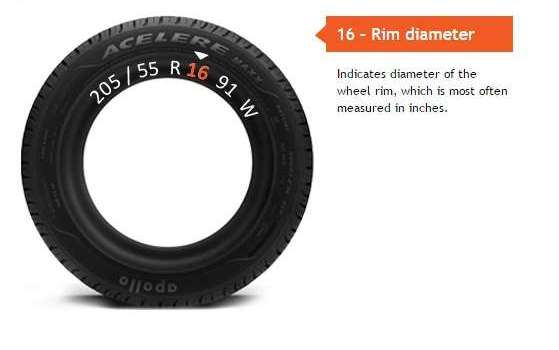
The tyre construction marking is followed by a one or two digit number which represents the diameter of the wheel in inches. For wheels with half an inch addition in the end, there would be a decimal representation, e.g. 18.5. In some rare cases, this number can also represent millimetres (thus three digits)
Load Index
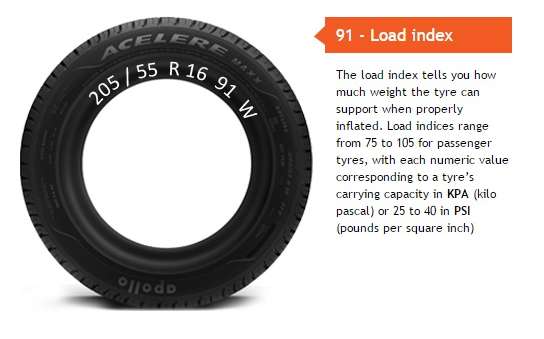
Following the size of the wheel, there is another two or three digit number, representing the load index. The load index on a passenger-car tyre stands for the maximum mass, or weight each tyre can carry.
The load index table below lists all the codes and the respective load the tyre can take for the rating.
| Code | Weight | Code | Weight | Code | Weight | Code | Weight |
| 60 | 250 kg (550 lb) | 80 | 450 kg (990 lb) | 100 | 800 kg (1,800 lb) | 120 | 1,400 kg (3,100 lb) |
| 61 | 257 kg (567 lb) | 81 | 462 kg (1,019 lb) | 101 | 825 kg (1,819 lb) | 121 | 1,450 kg (3,200 lb) |
| 62 | 265 kg (584 lb) | 82 | 475 kg (1,047 lb) | 102 | 850 kg (1,870 lb) | 122 | 1,500 kg (3,300 lb) |
| 63 | 272 kg (600 lb) | 83 | 487 kg (1,074 lb) | 103 | 875 kg (1,929 lb) | 123 | 1,550 kg (3,420 lb) |
| 64 | 280 kg (620 lb) | 84 | 500 kg (1,100 lb) | 104 | 900 kg (2,000 lb) | 124 | 1,600 kg (3,500 lb) |
| 65 | 290 kg (640 lb) | 85 | 515 kg (1,135 lb) | 105 | 925 kg (2,039 lb) | 125 | 1,650 kg (3,640 lb) |
| 66 | 300 kg (660 lb) | 86 | 530 kg (1,170 lb) | 106 | 950 kg (2,090 lb) | ||
| 67 | 307 kg (677 lb) | 87 | 545 kg (1,202 lb) | 107 | 975 kg (2,150 lb) | ||
| 68 | 315 kg (694 lb) | 88 | 560 kg (1,230 lb) | 108 | 1,000 kg (2,200 lb) | ||
| 69 | 325 kg (717 lb) | 89 | 580 kg (1,280 lb) | 109 | 1,030 kg (2,270 lb) | ||
| 70 | 335 kg (739 lb) | 90 | 600 kg (1,300 lb) | 110 | 1,060 kg (2,340 lb) | ||
| 71 | 345 kg (761 lb) | 91 | 615 kg (1,356 lb) | 111 | 1,090 kg (2,400 lb) | ||
| 72 | 355 kg (783 lb) | 92 | 630 kg (1,390 lb) | 112 | 1,120 kg (2,470 lb) | ||
| 73 | 365 kg (805 lb) | 93 | 650 kg (1,430 lb) | 113 | 1,150 kg (2,540 lb) | ||
| 74 | 375 kg (827 lb) | 94 | 670 kg (1,480 lb) | 114 | 1,180 kg (2,600 lb) | ||
| 75 | 387 kg (853 lb) | 95 | 690 kg (1,520 lb) | 115 | 1,215 kg (2,679 lb) | ||
| 76 | 400 kg (880 lb) | 96 | 710 kg (1,570 lb) | 116 | 1,250 kg (2,760 lb) | ||
| 77 | 412 kg (908 lb) | 97 | 730 kg (1,610 lb) | 117 | 1,285 kg (2,833 lb) | ||
| 78 | 425 kg (937 lb) | 98 | 750 kg (1,650 lb) | 118 | 1,320 kg (2,910 lb) | ||
| 79 | 437 kg (963 lb) | 99 | 775 kg (1,709 lb) | 119 | 1,360 kg (3,000 lb) |
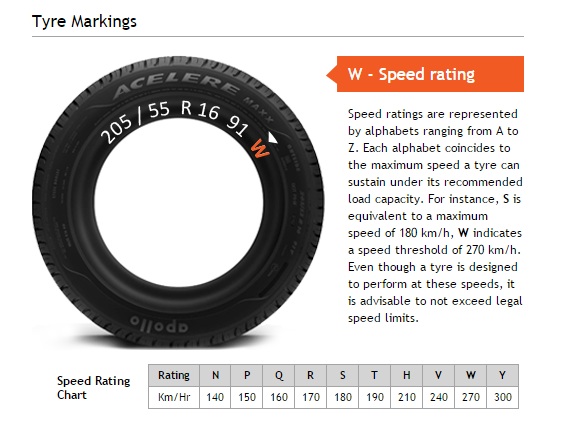
Speed rating
Different cars are meant to travel at different speeds. So while an everyday commuter car would do moderate speeds through its lifetime, a sports car would more often than not be driven at much higher velocities. To cater to different speed requirements, tyres are rated for speeds they can handle safely.
The speed rating is indicated by either a single letter, a combination of a letter and a digit (old tyres), or a letter in brackets. The complete list of speed rating codes and their respective speeds is provided below. Some of the rating codes are really old and represent very slow speeds. In most cases of modern passenger cars you will find tyres with a rating of N or above.
| Code | mph | km/h | Code | mph | km/h |
| A1 | 3 | 5 | L | 75 | 120 |
| A2 | 6 | 10 | M | 81 | 130 |
| A3 | 9 | 15 | N | 87 | 140 |
| A4 | 12 | 20 | P | 94 | 150 |
| A5 | 16 | 25 | Q | 100 | 160 |
| A6 | 19 | 30 | R | 106 | 170 |
| A7 | 22 | 35 | S | 112 | 180 |
| A8 | 25 | 40 | T | 118 | 190 |
| B | 31 | 50 | U | 124 | 200 |
| C | 37 | 60 | H | 130 | 210 |
| D | 40 | 65 | V | 149 | 240 |
| E | 43 | 70 | Z | 149+ | 240+ |
| F | 50 | 80 | W | 168 | 270 |
| G | 56 | 90 | (W) | 168+ | 270+ |
| J | 62 | 100 | Y | 186 | 300 |
| K | 68 | 110 | (Y) | 186+ | 300+ |
Date of Manufacture
The tyres come printed with information about when and where the tyre was manufactured. This information is represented by a series of letters and numbers. The first 8 characters that follow DOT (US Department of Transportation) marking (US specific) are a serial number indicating the tyre model and in which production facility it was made.
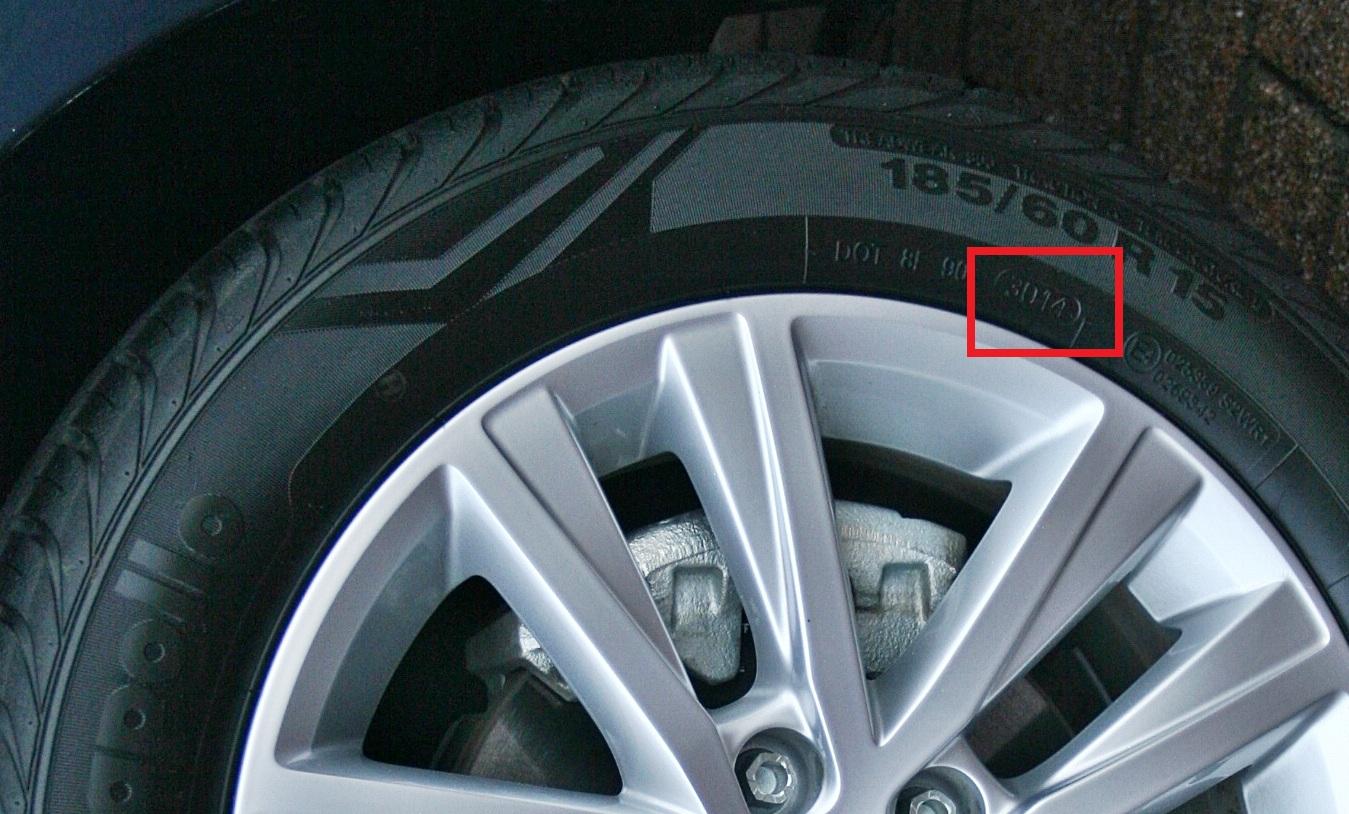
The last four digits, usually enclosed in an oval, tell you the date of production of the tyre. The first two digits represent the week of the year when the tyre was produced, and are numbered from 1 to 52. The last two digits represent the year. So, basically a tyre marked 3014 (as in the image above) was manufactured in the 30th week of 2014.
It’s an important marking, and a way for consumers to ensure that they’re not being sold old, aged tyres. Tyres tend to get hard and don’t work at optimum efficiency after 5-6 years.
Other common markings
There are a few other markings that tell you important details about the tyre. You need to remember these, as not taking care of these markings while installing a tyre may prevent it from performing optimally or even damage it.
Direction of rotation – It’s represented by an arrow. The tyre should be installed such that the arrow always moves in its head’s direction when the car is moving forward.
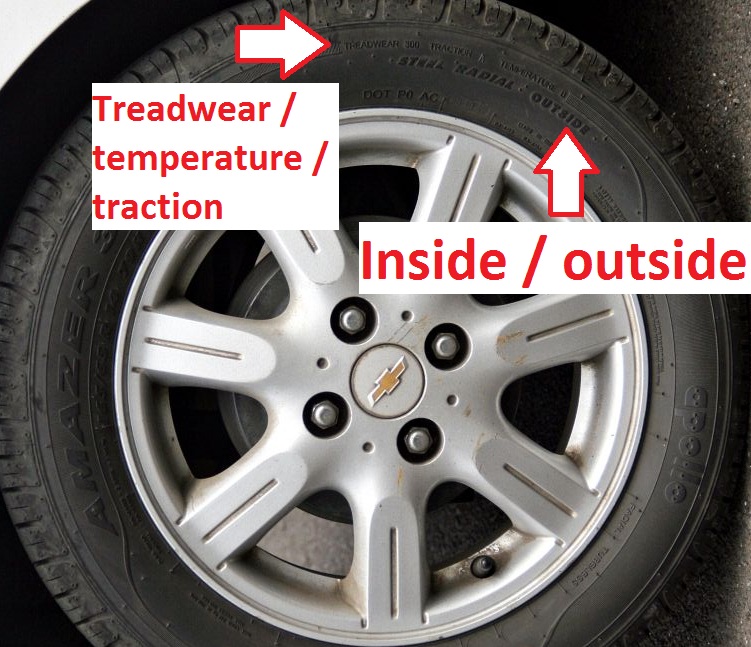
Inside / outside marking – in case of asymmetrical tyres, the inside and outside of the tyre is marked with the letters SFI (Side Facing Inside), SFO (Side Facing Outside) or words ‘Inside’ / ‘Inner’ or ‘Outside’ / ‘Outer’
Load and pressure – in some cases, the tyre will have explicit markings indicating the maximum pressure and maximum load the tyre can take. This isn’t necessarily provided on all tyres though. Also, it’s important to note that the maximum pressure is different from optimum pressure which is provided by the car manufacturer, in most cases, on the lower part of the door frames of the car.
Treadwear – The treadwear grade represents the the wear rate of the tyre in controlled test conditions. For example, a tyre graded 200 would last twice the distance as compared to a tyre graded 100. This may vary from brand to brand though, so one should compare these ratings within a brand, and not across brands. Wear rate also depends hugely on driving habits, maintenance practices and differences in road conditions.
Traction – The traction grades, from highest to lowest, are AA, A, B, and C, measured under controlled conditions. It generally indicates the adhesion offered by tyre in slippery (wet or snowy) conditions. It’s notable that the Traction rating is based on straight line braking traction tests and doesn’t represent cornering traction.
Temperature – The temperature grades are A (the highest), B, and C, representing the tire’s resistance to the generation of heat and its ability to dissipate heat when tested under controlled conditions on a specified indoor laboratory test wheel. Sustained high temperature can cause the material of the tire to degenerate and reduce tire life, and excessive temperature can lead to sudden tire failure. The grade C corresponds to a minimum level of performance that all passenger vehicle tires must meet under the Federal Motor Safety Standard No. 109. Grades B and A represent higher levels of performance on the laboratory test wheel than the minimum required by law. The temperature grade for a tire is established for a tire that is properly inflated and not overloaded. Excessive speed, under-inflation, or excessive loading, either separately or in combination, can cause heat buildup and tire failure.
M+S, or M&S – Tyres with these markings are all-season tyres, with self-cleaning tread and offering appreciable traction even in muddy, snowy or low temperature conditions.
M+SE – represents spike tyres
M+T, or M&T – Stands for Mud and Terrain. These tyres are meant to perform in even more difficult conditions, including mud, rough terrain including rocks, deeper snow and loose gravel.
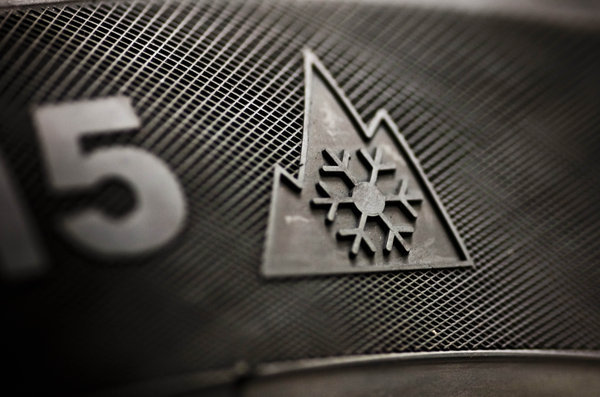
Snowflake icon – A snowflake icon on a tyre represents its capability to operate in the coldest and the most difficult conditions involving snow and ice.
TL – Tubeless
TT – Tube-type, this tyre must be used only with an inner tube
Made in ‘Country’ – Depicts the country of manufacture
TWI – It’s the tyre Tread Wear Indicator and points to the location of the wear indicators on the tyre. Placed on the sidewalls, it lets the user know where to find the raised wear indicators between the treads.
LL – Light Load. These tyres are meant only for light use, and not for heavy applications
SL – Standard Load. These tyres can be used under normal conditions and loads
XL or RF – Extra Load or Reinforced. These tyres can endure higher inflation pressures, and thus, higher loads.
In addition, some tyres might carry a manufacturer specific marking to indicate which carmaker they have specifically manufactured for. Here are some examples
MO – Original tires for Mercedes-Benz, Star – Original tires for BMW etc.
So that was it – everything you need to know about those markings on your car’s tyres, which sometimes can get very confusing. We earnestly hope that this guide helps you choose the right tyres for your car. Do share this informative piece with your friends and family who you think might find it useful. Drive safe!