
Silverstone is one of the best circuits in the world today. The high-speed 3.66 mile Arena Grand Prix Circuit is a real test of driving ability due to its distinctive fast, sweeping bends. So what’s the secret to putting together a competitive lap time at Silverstone? Let us talk you through each section of the track with a detailed 3D circuit map created by TrackDays.co.uk.
Sector One
Starting the lap off is the 296m run to the high-speed Abbey right –hander (1), which only requires a small lift off the accelerator, but make sure you avoid the kerbs. The left-hand Farm turn (2) is taken flat-out and brings you into the tricky right-hand Village hairpin (3), which is one of the slowest corners on the circuit and is great for overtaking. Make sure you use the kerb, but avoid the sausage. This brings you into The Loop (4), which is a left-hand hairpin and needs throttle on the exit to maximise speed into Aintree (5), which can be tricky in the wet. This leads onto the flat-out Wellington Straight.
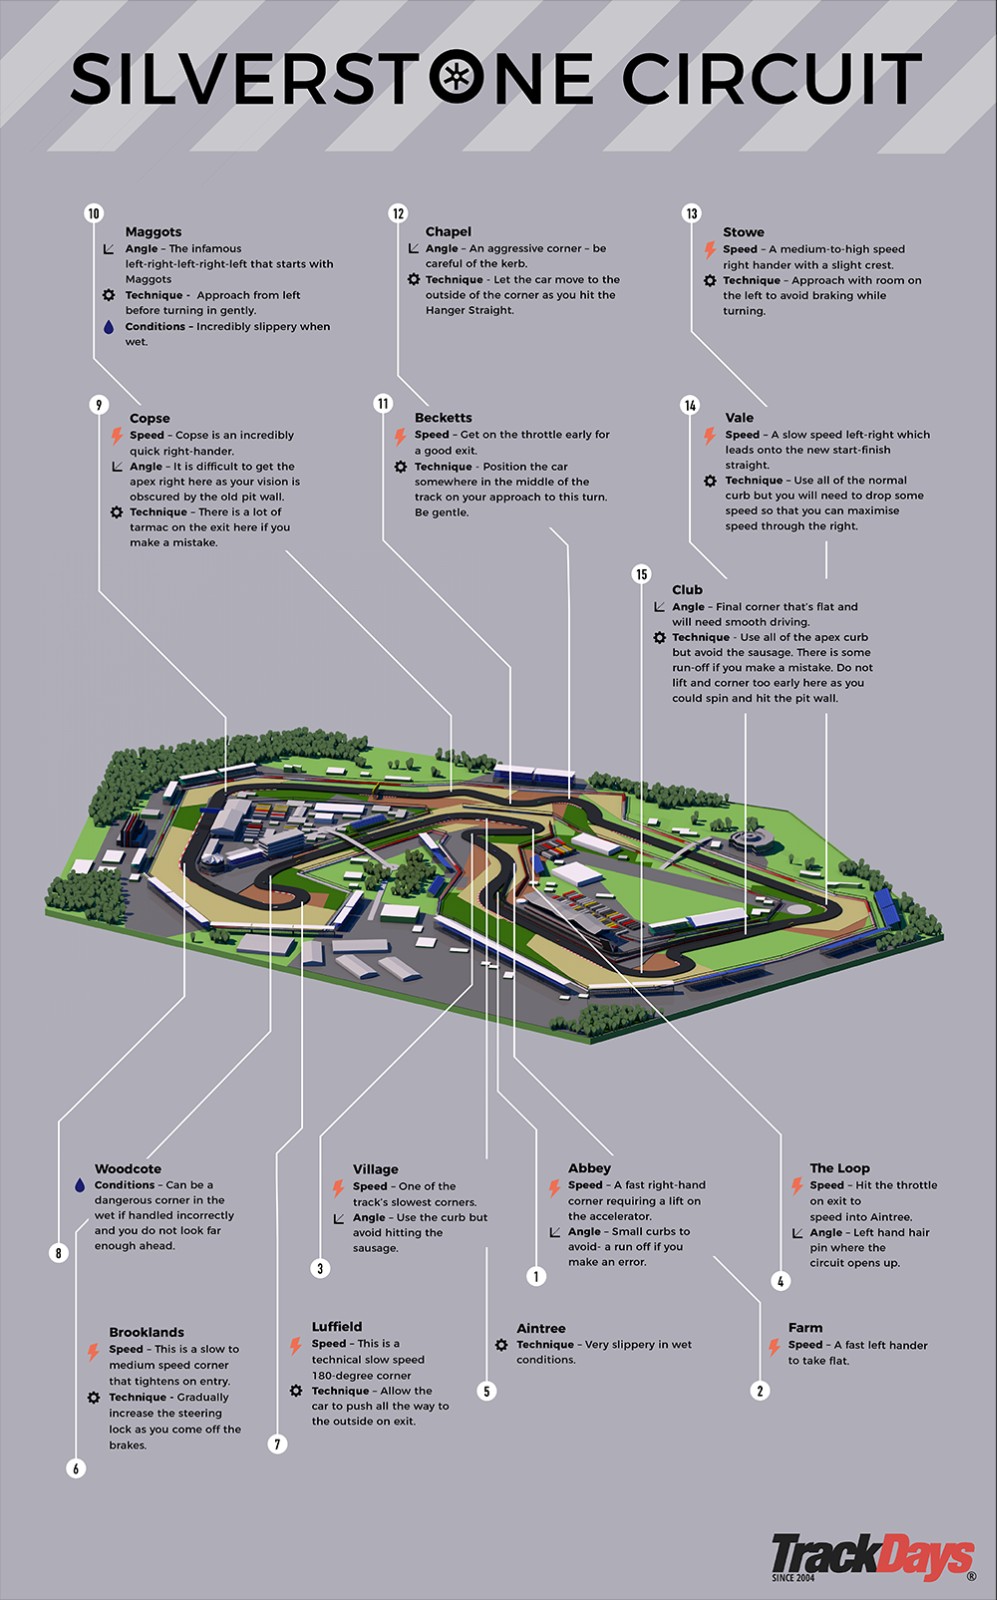
Sector Two
You will be arriving at high speed into the left-hand Brooklands (6), which needs care as the corner tightens on entry. Brooklands is best approached by gradually increasing the steering lock as you release the brake pedal. This is immediately followed by the right-hand Luffield section (7), which is a tricky, slow, 180-degree corner where you need to allow the car to push to the outside on exit to help acceleration into the flat-out Woodcote (8), which requires care in wet conditions. After accelerating past the National pit complex, you will arrive at the high-speed Copse (9) right-hander. Copse is a difficult corner as the pit wall obscures the corner apex on entry, however, there is a generous tarmac run-off area should you run wide. This is followed by the difficult high-speed sequence of corners, which starts with Maggotts (10). This can be very slippery in wet conditions and is best taken by approaching from the left before gently turning into the corner. Becketts (11) also needs a gentle approach, but make sure you get on the throttle early before Chapel (12), which is an aggressive corner where care must be taken to avoid the kerb. Allow the car to move to the outside on the exit of Chapel.
Sector Three
It’s flat-out down the Hangar straight before the medium/high-speed Stowe corner (13), which should be taken with room on the left to avoid losing speed braking whilst turning. This is followed by the slow left-right Vale sequence(14). Use the kerb as normal for Vale but make sure that you slow enough on entry to allow maximum acceleration through the right-hander. It’s then flat-out through the final Club corner (15), but make sure you avoid the sausage kerb, as hitting this may cause you to spin into the pit wall.